OPCUA Server
The fledge-north-opcua plugin is a rather unusual north plugin as it does not send data to a system, but rather acts as a server from which other systems can pull data from Fledge. This is slightly at odds with the concept of short running tasks for sending north and does require a little more configuration when creating the North OPCUA server.
The process of creating a North OPCUA Server start as with any other north setup by selecting the North option in the left-hand menu bar, then press the add icon in the top right corner. In the North Plugin list select the opcua option.
|
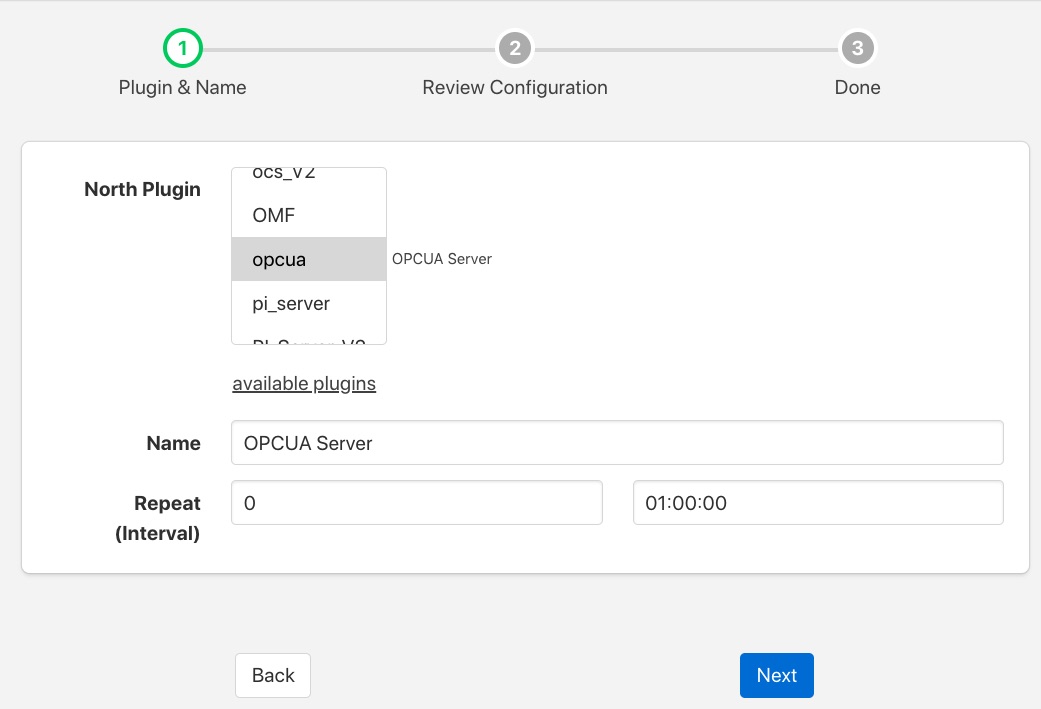
In addition to setting a name for this task it is recommended to run the OPCUA North as a service rather than a task. Running as a periodically restarted task will cause clients to be disconnected at regular intervals, when run as a service the disconnections do not occur. If run as a task set the Repeat interval to a higher value than the 30 second default as we will be later setting the maximum run time of the north task to a higher value. Once complete click on Next and move on to the configuration of the plugin itself.
|
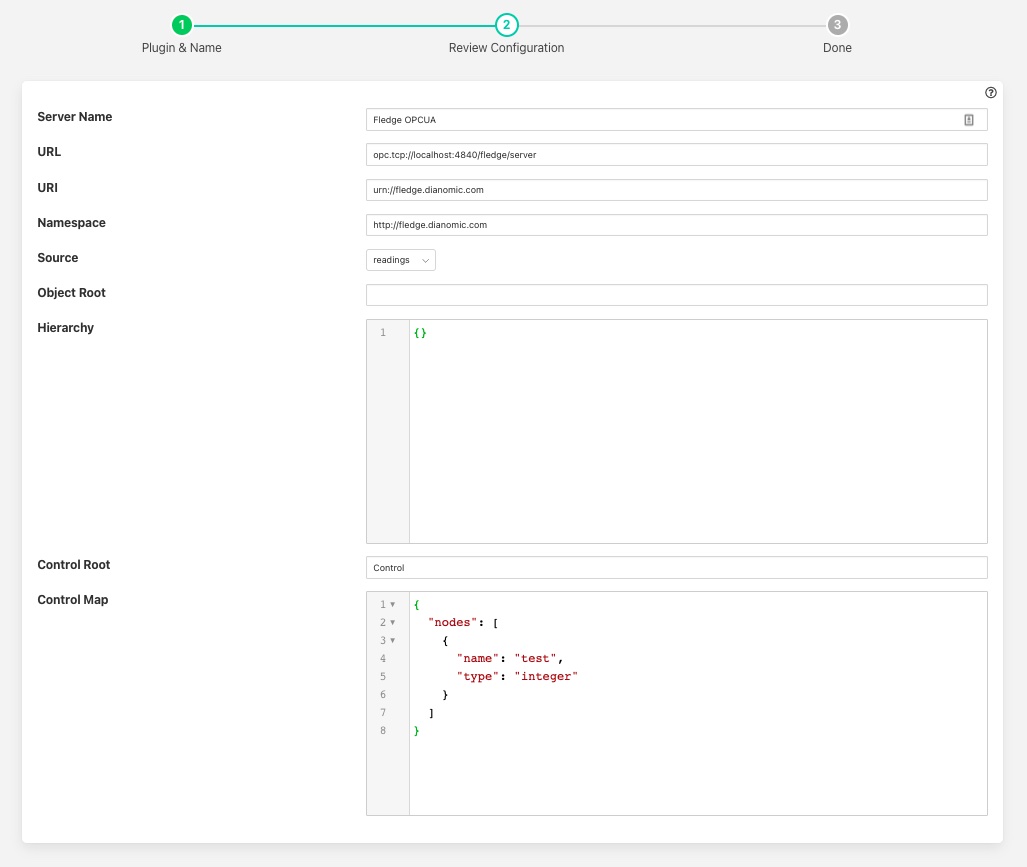
This second page allows for the setting of the configuration within the OPCUA server.
Server Name: The name the OPCUA server will report itself as to any client that connects to it.
URL: The URL that any client application will use to connect to the OPCUA server. This should always start opc.tcp://
URI: The URI you wish to associate to your data, this is part of the OPCUA specification and may be set to any option you wish or can be left as default.
Namespace: This defines the namespace that you wish to use for your OPCUA objects. If you are not employing a client that does namespace checking this is best left as the default.
Source: What data is being made available via this OPCUA server. You may chose to make the reading data available, the Fledge statistics or the Fledge audit log.
Object Root: This item can be used to define a root within the OPCUA server under which all objects are stored. If left empty then the objects will be created under the root.
Hierarchy: This allows you to define a hierarchy for the OPCUA objects that is based on the meta data within the readings. See below for the definition of hierarchies.
Control Root: The root node under whuch all control nodes will be created in the OPCUA server.
Control Map: This is defined if you wish your OPC/UA server to allow write to specific nodes to cause control inputs into the Fledge system. The definition of the control map is shown below.
Once you have completed your configuration click Next to move to the final page and then enable your north task and click Done.
The only step left is to modify the duration for which the task runs. This can only be done after it has been run for the first time. Enter your North task list again and select the OPCUA North that you just created. This will show the configuration of your North task. Click on the Show Advanced Config option to display your advanced configuration.
|
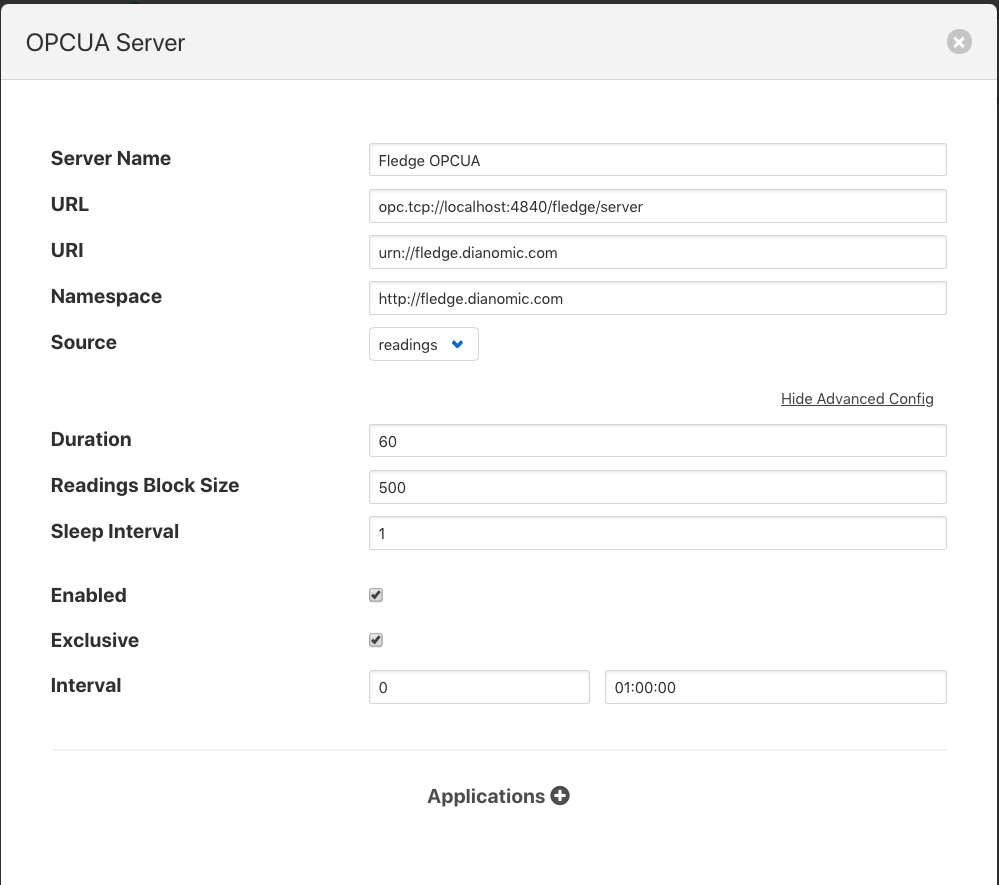
The Duration option controls how long the north task will run before stopping. Each time it stops any client connected to the Fledge OPCUA server will be disconnected, in order to reduce the disconnect/reconnect volumes it is advisable to set this to a value greater than the 60 second default. In our example here we set the repeat interval to one hour, so ideally we should set the duration to an hour also such that there is no time when an OPCUA server is not running. Duration is set in seconds, so should be 3600 in our example.
Hierarchy Definition
The hierarchy definition is a JSON document that defines where in the object hierarchy data is placed. The placement is controlled by meta data attached to the readings.
Assuming that we attach meta data to each of the assets we read that give a plant name and building to each asset using the names plant and building on those assets. If we wanted to store all data for the same plant in a single location in the OPCUA object hierarchy and have each building under the plant, then we can define a hierarchy as follows
{
    "plant" :
              {
                  "building" : ""
              }
}
If we had the following 4 assets with the metadata as defined
{
     "asset_code" : "A",
     "plant"      : "Bolton",
     "building"   : "10"
     ....
}
{
     "asset_code" : "B",
     "plant"      : "Bolton",
     "building"   : "7"
     ....
}
{
     "asset_code" : "C",
     "plant"      : "Milan",
     "building"   : "A"
     ....
}
{
     "asset_code" : "D",
     "plant"      : "Milan",
     "building"   : "C"
     ....
}
{
     "asset_code" : "General",
     "plant"      : "Milan",
     ....
}
The data would be shown in the OPCUA server in the following structure
Bolton
          10
                 A
          7
                 B
Milan
          A
                 C
          C
                 D
          General
Any data that does not fit this structure will be stored at the root.
Control Map
A control map consists of a JSON documents that defines a number of nodes within the OPC/UA server. Each of these nodes may have a set of properties that define the actions to take when the node is modified.
The following cpntrol map defines two control nodes called FanSpeed and FanPitch, both of which are of type integer.
{
   "nodes" : [
       {
           "name" : "FanSpeed",
           "type" : "integer"
       },
       {
           "name" : "FanPitch",
           "type" : "integer"
       }
   ]
}
The nodes above have no properties that define the action to take when the nodes are written. When a change is made to either of these codes the control service dispatcher will be called with a broadcast request. Changing the value of FanSpeed in the OPC/UA north server will therefore cause every services that supports a control interface to be called with a write request to update FanSpeed.
Adding the property service to a control node will cause the action taken on modification of the node to only be applied to that service.
{
   "nodes" : [
       {
           "name"    : "FanSpeed",
           "type"    : "integer"
           "service" : "FanController"
       }
   ]
}
The above control node defintion would result in changes to the FanSpeed node only calling the south service name FanController with a write request.
The property asset can be used to limit the action to just the south service that is responsible for ingesting the named asset.
{
   "nodes" : [
       {
           "name"  : "FanSpeed",
           "type"  : "integer"
           "asset" : "Fan012"
       }
   ]
}
The above would therefore only send the write reuest to the south service that ingests the asset Fan012 when the OPC/UA node is updated.
The final option supported is to execute a script in the service dispatcher, this is specified using the script property.
{
   "nodes" : [
       {
           "name"   : "FanSpeed",
           "type"   : "integer"
           "script" : "FanUpdate"
       }
   ]
}
Only one of service, asset or script properties should be present per node in the control map.